Logo and Photo Quality: How Big is Big Enough?
A frequent conversation we have with clients is on the subject of logo and photo reproduction quality. Typically, the client needs to know if a photograph or a logo image is high enough quality for their intended use. For instance, one client had a logo designed for their website, and wanted to know if they could take that image and use it in a printed brochure. Another client had a photograph and wanted to know if they could reproduce it as a large poster.
Quality is important, and understanding some of the basic terms involved in quality issues is key – so here is a basic, simple rundown.
What is a bitmap?
Most images you see on the computer are bitmap images. Photos taken with a digital camera are bitmap images. Popular image manipulation programs like Photoshop, Corel Paintshop or MS Paint deal with bitmapped images.
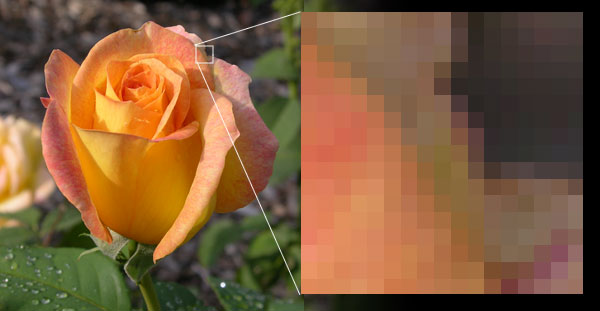
If you blow up a bitmapped image, like the one above, you will see that it is composed of tiny colored squares. Each square is only one color. These squares are called pixels. A bit is a unit of computer information (to keep it simple). Each of these pixels contains a number of these bits of information that tell the computer exactly what color to display – its exact hue, value and saturation levels.
Common bitmap file types include BMP (the raw bitmap format), JPEG, GIF, and TIFF.
The quality of an image depends on how many of these pixels there are per inch. This is called “pixels per inch” or ppi. It is also sometimes called “dots per inch” or dpi.
What do high-resolution and low-resolution mean?
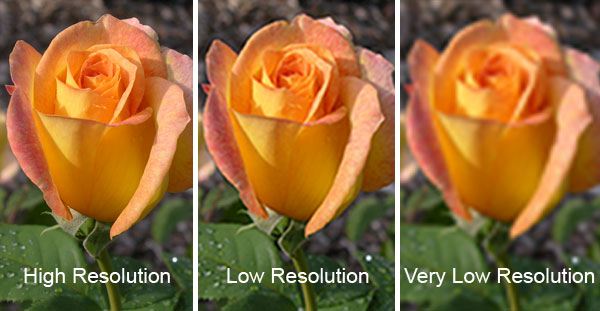
High-resolution (or hi-res) means that an image has a high amount of detail. It has a high pixel-per-inch count. Images used for printing, for instance, normally have at least 300 pixels per inch (300 ppi or 300 dpi). Low-resolution images have a lower pixel-per-inch count and thus, less detail.
Images used on the internet generally have a lower pixel-per-inch count – 72 pixels per inch (72 ppi or 72 dpi). Images that have fewer pixels per inch are considered low resolution for internet use.
If you try to use an image that is lower than 300 dpi to print something, it will start to look blurry or fuzzy. See the examples above.
Similarly, if you try to use an image that is lower than 72 dpi on the internet, the same thing will happen. It will start to look blurry or fuzzy.
So how big is my image?
“That’s all very well,” you might say, “but how big is my image? How do I find that out?”
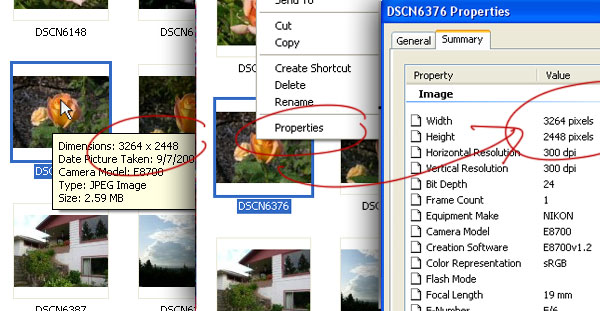
If you go to the folder where your image is stored, find the image, and then hover your mouse over it, you should get a pop-up box that tells you the size in pixels (see the image to the left, above). If that doesn’t work, right-click on the image file and go to “Properties.” You may have to hunt around to find it, but it’s there. In my case, I went to the “Summary” tab and clicked an option called “Advanced.”
So how do I figure out if my image is big enough?
Once you know the size of your image in pixels, you can easily figure out how big it can be for a printed piece or for the internet.
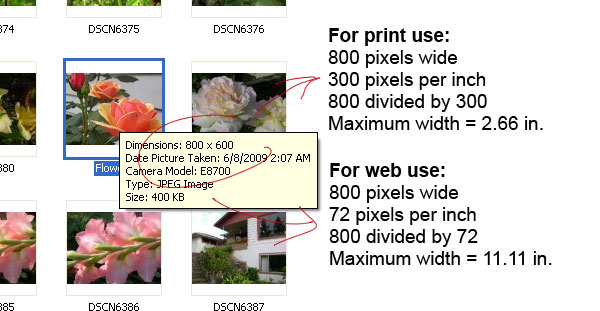
To use the above example, the image is 800 pixels wide. We know that an image for print needs to be 300 pixels per inch. So if you divide 800 pixels by 300 ppi, you get a maximum of 2.66 inches. That’s as big as you can go. If you try to make it any larger than that in your brochure, it will start to look blurry and soft.
If you want to use that same image for the web, we know that web images are 72 ppi. If you divide 800 pixels by 72 ppi, you get 11.11 inches. So this same photo could be quite large on a website.
What is a vector image?
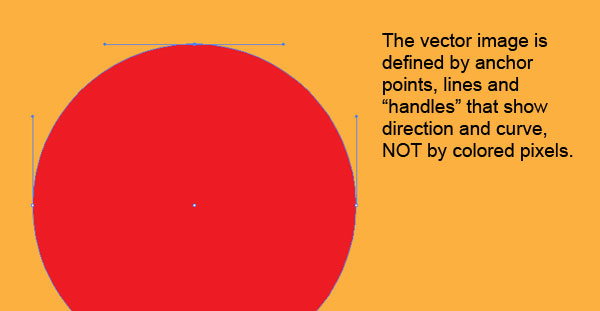
A vector image uses mathematics to define shapes, not pixels. Shapes are defined by anchor points, lines and control point “handles” that define direction and curvature. Vector images are created in programs like Adobe Illustrator and CorelDraw.
What is the advantage of using a vector image?
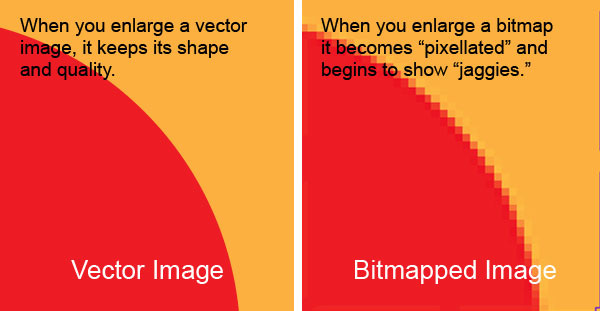
Since a vector image has no pixels, it does not lose quality if you enlarge it. If you look at the above images, you’ll see that when you blow up the pixel image, it starts to look “pixilated.” You start to get what are called “jaggies” along the curved edges. But if you enlarge a vector image, it still looks perfect no matter how big it gets.
This is why we always produce client logos as vector images. That way, if you want to use it on something as small as a business card or as large as the side of a building, it will always look crisp and perfect, with no degradation of quality.
I hope this has helped to clear up some of the mystery regarding image sizes and uses. It’s important to know these things and to ensure that your images represent the quality and care of your company.


